Introduction to Spreadsheet
A spreadsheet is a computer software that helps you organize and process mathematical data. It can help you add, subtract, multiply, and divide quickly. You can save a lot of time especially when you have to calculate large amount of data. you can also create graphs and charts from spreadsheets to show the data in a way that is easy to understand.
Spreadsheet Program
- e. version of a Columnar pad.
- it is an application that helps you to create spreadsheets commonly used for budgets, forecasting, and other finance-related task.
- for instance, the salary computation for 50 workers can be done with the help of a simple spreadsheet program.
Electronic Spreadsheet
- e. version of an accountants paper spreadsheet (worksheet).
- since data are entered and calculated electronically, they ca also be edited electronically.
- you do away with pencils, erasers and calculators to process data in rows and columns.

Starting Microsoft Excel
You can start MS Excel in two ways:
- Double-click the Microsoft Excel icon on the desktop.
- Click start | programs | Microsoft Excel. MS Excel opens with an empty worksheet.
PROGRAM
|
DEVELOPERS
|
BUNDLES
|
1. Superscale
|
Sorcim-computer associates
|
|
2. Multiplan
|
Microsoft corporation
|
|
3. Lotus 1-2-3
|
International business machines corporation
|
IBM’s Lotus Smart Suite
|
4. Symphony
|
(IBM)
|
|
5. Excel
|
Microsoft
|
Microsoft Office
|
6. Quattro Pro
|
Borland International Inc. – corel Corporation
|
Corels Word-Perfect office Suite
|
7. Works
|
Microsoft
|
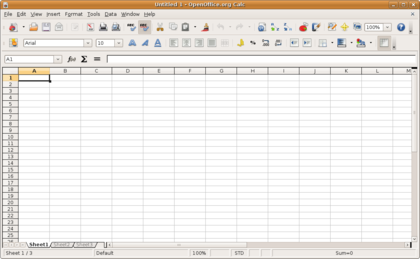
The MS Excel window is similar to another windows applications, with some additional parts.
- Title bar - tells you the name of the displayed file.
- Menu bar - has a set of drop-down menus that provides you list of commands available in MS Excel.
- Standard toolbar - is a row of buttons you can use to select common commands, such as save and print.
- Formula bar - displays the cell reference and the contents of the active cell.
- Cell reference - identifies the location of each cell in a worksheet and consists of a column letter followed by a row number, such as A1.
- Active cell - displays a thick border. You can enter data into the active cell.
- Cell - is the area where a row and a column intersect.
- Column - is a vertical line of cells. A letter identifies each column.
- Row - is a horizontal line of cells. A number identifies each row.
- Worksheet tabs - let you move from one worksheet to another. The tabs are labeled with Sheet1, Sheet2, and Sheet3.
- Scroll bar - allows you to browse through a worksheet.
- Task pane - contains links you can select to perform common tasks, such as opening or creating a workbook.
- Window control Icon - open menus that manipulate the program window or workbook window.
- Window control buttons - minimize ( to reduce to a button placed on the task bar).
- Toolbars - they contain a variety of buttons that can perform frequently used operations and task in Excel.
- Name box - it displays the name or location of the active cell of a single-celled range, a chart item or a drawing object.
- Split box - it is dragged (while mouse pointer is a sizing arrow) along the vertical or the horizontal scroll bars to split a window to two panes or views of the same workbook.
- Mouse pointer - onscreen cross (when pointing to a cell), slanting arrow (when pointing to a button or toolbar), I-beam (when inserting data), sizing arrow (that indicates the current location affected by your mouse actions).
- Gridlines - they indicate the physical limit of the grid of rows and columns of a spreadsheet; may be displayed or printed.
- Worksheet area - this is the entire worksheet and all it's elements, including cells, gridlines, row and column headings, scroll bars and worksheet tabs.
- Tab scrolling buttons - these VCR-like controls allow you to move quickly through the sheet of a workbook.
- Tab split box - it is dragged left or right to adjust sizes of the area to display sheet tabs and the area to display the horizontal scroll bar.
- Border - it outlines the application or the document window.
- Scroll bars - they allow you to view more cells not displayed initially on the screen ; allow you to navigate through the rows and columns of a worksheet.
- Status bar - it tells what the excel id doing or ready to do or prompts you with some message or instructions. It does by showing mod indicators and the keyboard indicator codes.

The Worksheet Grid
Each MS Excel file is a workbook that an hold many worksheets. The worksheet is made up of columns and a rows.
Columns go up and down the worksheet. they are labeled with letters from A to IV. The first twenty-six columns are labeled A to Z, the next twenty-six are AA to AZ, then BA to BZ, and so on up to column IV, for a total of 256 columns.
Rows go across the worksheet. They are labeled with numbers from 1 to 65,536. When the rows and the columns are laid upon each other, a grid is formed. Each box in the grid is called cell. Each cell ha a cell address which is made up of the column latter and the row number.
Creating a Worksheet
Moving through Cells
You use mouse to select a cell you want to begin adding data to. You can use the following keyboard strokes to move through the ells of a worksheet.
To Move
|
Press
|
One cell up
|
Up arrow key
|
One cell down
|
Down arrow key or Enter
|
One cell to the left
|
Left arrow key
|
One cell to the right
|
Right arrow key or Tab
|
Top of the worksheet (cell A1)
|
Ctrl + Home
|
End of the worksheet (last cell containing data)
|
Ctrl + End
|
End of the column
|
Ctrl + Down arrow key
|
Cell Content
Cells can contain words, numbers, or mathematical formulas. In spreadsheet, words are called Labels.When you put numbers in cell, they are called Values. The labels tell you what the values mean.

Entering Data
To enter data into the worksheet:
- Click the ell where you want to type your data.
- Type your data. As you do, he data appears in the cell, and also in the formula bar. Numbers are always aligned on the right-had side of the columns, while text are placed on the left.
- Press the Enter key. The cursor moves down to the next cell.
Editing the Contents of a Cell
To edit the content of a cell.
- Click on the cell that contains the incorrect entry. The value or formula appears in the formula bar.
- To replace the entry, just type a new entry to overwrite the existing entry.
To delete the contents of a cell, click on the cell and press the Delete key.
Working with Ranges
Many operations within MS Excel require you to refer to a range of cells at one time. A range may be a cell range (single cell), a column range, a row range, or a block range (a rectangular group of cells). The range is identified by the cells in the top left-hand and bottom right-hand corners of the rectangle, separated by a colon (:). For example, the range B1:B7 identifies a range containing seven cells: B1, B2, B3, B4, B5, B6, and B7.
To specify a range

- Position the mouse pointer on the first cell of the range you want to include. Notice that the mouse pointer changes to a thick across the cell.
- Drag the mouse until the last cell in the range is selected.
- Release the mouse. All the cells within the specified block of cells are included in the range.
Moving and copying Cells
- Click the cell that you want to move or copy. If you are copying a range of cells, then you have to highlight the range of cells.
- To move or copy the selection, click Cut or click Copy on the standard toolbar. Notice the dotted lines appearing on the cell or range of cells.
- Click where you want to move or copy the cell or range of cells.
- Click Paste and then press Enter.
Drag and Drop
If you are moving the cell content only a short distance, the drag-and-drop method may be easier. Simply drag the highlighted border of the selected cell to the destination cell with the mouse.
To save a Worksheet
- Click File/Save. The Save As dialog box appears.
- Choose the drive where you want to save the worksheet.
- Type a file name.
- Click Save. The file is saved, the new name appears on the title bar, and you can continue editing.
La impresionante y poderosa sugerencia del autor de este blog me resulta realmente útil.
ReplyDeleteMicrosoft 365 Copilot for Finance